The wedding video industry is timeless.
One day, most people will get married. Maybe even you. You might be in a casual relationship with your partner now, but deep down, you might want to take it to the next level and make it more strong and sacred. The first step for anyone wanting to get married is having that desire.
I’m confident that you’ll want your beautiful, memorable, and sacred wedding to be well-documented. Knowing how to edit wedding video can ensure that you and your spouse (or even your clients) can look back on your sweet memories by watching the expertly crafted videos from your wedding day.
One form of documentation is video.
Videos have a longer-lasting trend compared to other types. Remember when we used photos to capture events? Then, technology evolved, and we could turn those photos into videos. From what I can see, and you might agree, no technology on the horizon will replace video.
So, when you combine “wedding” and “video,” you get a powerful formula for generating income. Most people will get married and want a beautiful video documenting their wedding.
Voila!
A wedding videographer captures your wedding on camera, and a wedding video editor turns the raw video and audio into a beautiful film.
To become a wedding video editor, you need the right skills. You might be wondering, why learn wedding video editing? I’ll explain the reasons below.
Why You Should Learn How to Edit Wedding Videos
Here’s my simple answer: if you love making videos, enjoy seeing people happy in their relationships, and want to make money from it, learning how to edit wedding video could be a great career choice for you.
Now for the more detailed answer:
- Growing Industry: As I mentioned earlier, the wedding video industry is booming and is here to stay. Many couples are now investing in high-quality wedding videographers to get amazing wedding videos. This creates a demand for wedding video editors.
- High Earning Potential: Wedding video editing offers great earning potential because couples value high-quality videos to capture their special moments. Skilled editors who can deliver outstanding work often command higher rates in this growing market.
- Flexibility: Learning how to edit wedding video allows for flexible work arrangements. Whether you prefer working independently or with a team, you can adjust your schedule to suit your lifestyle. This flexibility extends to where you work, making it possible to edit from anywhere with the right tools.
- Business Opportunities: Learning wedding video editing opens doors to various business opportunities. You can start your own freelance business, work with videographers, or expand into related fields like video marketing for weddings. The demand for quality wedding videos creates multiple avenues for growth and entrepreneurship in this dynamic industry.
Interested yet?
Great!
But maybe you’re wondering where to start. Don’t worry, I’ll guide you through how to edit wedding video in this article. Let’s get started!
Pre-Editing on How to Edit Wedding Video
How to Edit Wedding Videos: Study the Client’s Brief
Every client has their own expectations for what their wedding video should look like, so you need to treat each one differently. When learning how to edit wedding video, it’s essential to understand the client’s vision.
Some clients have very specific instructions on what to do and what not to do. For example, they might want the video to be high-energy to show how crazy their wedding reception was. They may have a clear vision for the opening scene, the storytelling, and more.
On the other hand, some clients leave everything up to your creativity. They trust you with all aspects of the editing. Their brief might be very simple, like, “Hey, I want my wedding video to look cinematic and timeless.”
It’s crucial to learn your client’s brief before starting the wedding video editing.

Why?
Because you need to understand their expectations first. When you know how to edit wedding video according to their brief, it makes you more efficient and reduces the chances of having to do many revisions later on.
Client briefs can vary widely.
For example, what style of wedding video do they want? What kind of storytelling approach do they prefer? Do they want a chronological or non-linear wedding film? Do they have specific notes or ideas for their video?
Besides the brief, clients might give you wedding video samples they like. Watch these samples to get a reference for the editing. You don’t need to replicate them 100%, but use them as inspiration. The more information you have about your client’s expectations, the better.
Once you feel confident about what your client wants for their wedding video, you can move on to the next step.
Determine the Type of Wedding Video for How to Edit Wedding Video
There are several popular types of wedding videos in the industry, categorized by film duration, creativity, goals, and more. Learn about the different types in the article below:
Wedding Video Types: The Popular 4 You Need to Know
In this guide, I’ll focus on the Wedding Highlight Video.
The Wedding Highlight Video is the most popular type in the industry. These are the wedding videos you typically see on YouTube or Vimeo. Here are some characteristics of Wedding Highlight Videos:
- Shorter duration compared to Wedding Documentary Videos.
- Duration ranges from 2 to 20 minutes.
- Can be chronological or non-linear.
- Showcases key events from the wedding.
- Combines montages with voice-overs.
- Focuses on beauty and cinematic aspects rather than purely documenting events.
Now that you know the characteristics of a Wedding Highlight Video, let’s move on to the next step.
Download the Music and Other Assets Needed for the Project
In your client’s brief, they usually provide some music they love or want you to use as a reference. If they have provided music files, download them first. If not, you can choose music from several websites, like Musicbed.
I use Musicbed to source music for my clients. It has a wide range of genres, from cinematic to funky EDM. You can also filter music by mood, so if you need something dark and mysterious, you can find it there.
Songs for Wedding Video: 10 Edgy Options from Musicbed
Besides music, you may need to download other assets like your client’s logo, graphics for the wedding video, or sound effects to enhance the video’s dynamics.
Import All Files to Editing Software
For this how to edit wedding video guide, I’m using Premiere Pro.
Import all files, including clips, audio files, and assets, directly into Premiere Pro without filtering them in Finder or Explorer.
Some newbie video editors make the mistake of filtering clips outside the editing software, which can lead to missing important clips. So, import everything and then filter or select the best clips inside Premiere Pro.
Wait for the import process to finish.
Premiere Pro will generate peak files after importing, creating small clips stored in your cache folder. Do not interrupt this process, as it can damage your files. The process is complete when the loading bar at the bottom right of Premiere Pro disappears.
Once you’ve imported all files properly, let’s move on to the next step.
Organize the Files Properly and Efficiently
You can’t start editing the wedding video right after importing all files into Premiere Pro. First, you need to organize your clips and audio files efficiently.
Imagine having a messy wardrobe and trying to find a specific item. It would be stressful and time-consuming. Similarly, a well-organized editing project makes the workflow efficient and stress-free.
Here’s what you should do:
First, understand the typical events in a Western wedding:
- Preparation
- First Look
- Ceremony
- Photoshoot
- Cocktail Hour
- Reception
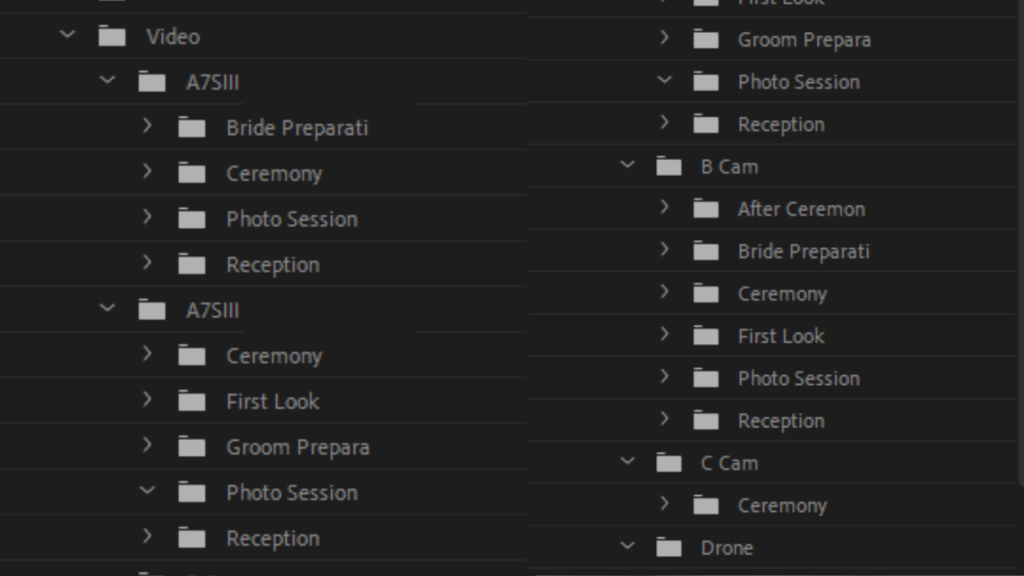
Now, create folders named “Bride Preparation,” “Groom Preparation,” and so on, up to “Reception.” Organize every clip according to these events.
At this stage, you’ve set up everything you need before starting the editing process. Now, let’s dive into the editing stage.
How to Edit Wedding Video: On Editing
Editing is Like Cooking
I always tell my students that wedding video editing is like cooking a meal. You can’t just throw every ingredient into a frying pan and expect a delicious spaghetti dish to be ready instantly.
You need to prepare everything first.
Let’s take cooking spaghetti for an example.
When cooking spaghetti, you gather your kitchen tools like knives, bowls, and pots. You dice the tomatoes, cut the chicken or bacon, and ensure you have all the seasonings ready before turning on the stove.
Similarly, in editing, preparation is key.
While the pre-editing section involves a lot of preparation, there are still some important steps to take during the editing stage. The first step is:
Cull Your Clips to Find the Best Scenes
Culling clips involves finding the best scenes in each clip.
A single clip might contain multiple great scenes because the videographer could shoot the same object using different compositions. For example, during the photo session, the couple might start with a simple walk and then share a romantic hug and kiss.
In party dancing scenes, you might find hidden gems by skimming through the clip to select the best parts. Many projects I’ve worked on had seemingly boring clips that contained fantastic scenes if you looked closely.
Culling clips not only helps you select the best footage but also sparks creative ideas for your edit. Here’s how you can do it:
- Import all clips into layer V1 on your timeline.
- Skim through the clips and, when you find a good scene, cut it and move it to layer V2.
This way, you still have the unselected scenes in layer V1.
For newbies that want to learn how to edit wedding video, I recommend keeping the unselected scenes because you might need them later. Once you’ve culled your clips, move on to the next step.
Sync All Camera Angles in Your Multicam Scene
In a typical Western wedding, there are events like the ceremony and speeches that are captured with multiple cameras.
There might be a stationary camera capturing a wide angle, a gimbal camera capturing guests and candid moments, and possibly additional cameras operated by second shooters.
Professional videographers also use audio recorders to capture clear sound.
When editing, you’ll likely have multiple camera angles and audio files. This is where multicam editing comes in. Here’s how to do it:
- Identify the clips from each angle that belong to the ceremony scene.
- Identify the audio files for the ceremony.
- Sync all clips and audio files. You can use Premiere Pro’s sync feature or third-party apps like PluralEyes or Tentacle Sync.
- Once synced, select all clips, right-click, and choose “Nest…”
- Right-click the nested video, then choose “Multicam” -> “Enable.”
- Enable the Multicam Feature on the Program Monitor in Premiere Pro.
Now you’re ready for multicam editing!
I found a helpful YouTube visualization for creating a multicam edit.
Some projects might have three camera angles for the ceremony, while others, like Indian weddings, might have up to eight. Editing such projects can be challenging, but using proxy files can speed up your computer’s performance.
If You’re Editing a Documentary Film, Start with the Multicam Scene
Why?
They typically become the heaviest parts when you’re editing a wedding video project. This editing stage also requires more of your concentration because you need to monitor which angle best suits specific moments.
So, let’s tackle the heavier part first.
Below is a list of events that usually involve multicam editing:
- First Look
- Ceremony
- Reception Entrance
- First Dance
- Parent Dances
- Speeches
- Traditional Dancing
During the multicam edit stage, it’s not simply about changing angles randomly.
No.
There’s creative thinking or decision-making behind it.
The fundamental idea behind multicam editing is choosing the right angle for the moment that’s happening.
For example, if the bride is reading vows, you should choose an angle that clearly shows her face, is focused, and well-composed, rather than a safe, wide-centered shot from a tripod.
It’s not just about choosing the camera angle; you also need to select the right audio source for the people speaking at that moment. For instance, if the officiant is narrating the couple’s story, instead of using the groom’s mic audio, use the officiant’s attached audio.
If you’re still unsure about the fundamentals of multicam editing, check out the article below:
How to Sync Multi Camera Angles on Premiere Pro
If You’re Editing a Highlight Film, Find the Audio Bites for Your Film
To create a great highlight film, you need a strong film skeleton, which combines music and audio placements to create a structure.
To help you understand this better, please watch the highlight film below. Notice how the editor tells a story through the audio bite structure they’ve created:
Finished watching? Let’s get back to the topic!
Below is a list of event sources for finding audio bites:
- Letter Reading
- Ceremony
- Speeches
- Rehearsal Dinner Speech
After watching the highlight film, you might be confused about which types of audio bites to find and select for your wedding highlight film. Don’t worry, I’ve got a solution!
I categorize audio bites from all event sources into five levels. These levels represent the likelihood of finding each type in every wedding. You may not find every level in a wedding, but you’ll find some from these five levels.
Audio Bites Level
Level 1 is the “must-use” type of audio bite—unique, strong, and romantic, telling the story about the couple. For example, the officiant telling the story of how the couple met and their unique love story, or the father of the bride expressing pride in how the groom has changed the bride for the better, with tears in his eyes.
You can find Level 1 audio bites in letter readings, personal vows, the officiant’s story during the ceremony, and some reception speeches.
Level 2 audio bites tell stories about each individual in the couple. For instance, the maid of honor praising the bride’s personality traits—cheerful, supportive, caring—or the best man explaining how great the groom is for the bride.
You can find Level 2 audio bites in the ceremony, interviews during cocktail hours, and speeches.
Level 3 includes audio bites from readings during the ceremony, such as passages about love from Corinthians or other lovely words often heard at weddings.
You can find Level 3 audio bites in the ceremony.
Level 4 comprises somewhat religious audio bites, like prayers from the officiant or religious advice, which are less common in wedding highlight films.
You can find Level 4 audio bites in the ceremony.
Level 5 includes wishes, marital advice, and congratulatory words, such as groomsmen offering advice found online or standard well-wishes heard at many weddings.
You can find Level 5 audio bites in guest interviews and reception speeches.
If you’re curious about how to create a story structure using these audio bite levels effectively, download the comprehensive guide that I made special for you.
When finding audio bites, consider these tips:
- Each audio bite should convey one context; avoid choosing parts with multiple contexts unless you plan to continue the story in the next audio bite.
- Not every sentence in a speech will be usable as-is; you may need to trim or add words for clarity.
- Ideally, audio bites should be 15 to 40 seconds long, depending on how they fit with your chosen music.
- Clean up audio bites by removing mumbling, double words, overly long silent parts, and unnecessary words.
- Use Premiere’s color labels to mark selected audio bites by level and event. For example, use Rose for Level 1 audio bites and Mango for ceremony audio bites. This increases efficiency by making it easier to find needed audio bites when structuring your highlight film later.
How to Edit Wedding Video: Begin the Editing Process
Now that you have culled clips and edited multicam scenes well, and have selected some audio bites.
Now you’re ready to begin the editing process.
Let’s set up your sequence based on the client’s preferences. Pay attention to the resolution and FPS settings you need. Some videographers shoot clips in 1080p at 60fps, while others prefer 4K resolution—so be aware of these details.
If you’re working on a Full Length film, begin by editing the montage section. Since you already have the music, start placing it on the timeline and add your culled clips to the montage sequence.
Having your culled clips ready gives you a significant advantage when editing a montage. At this stage, focus on arranging the clips to create a cohesive sequence. Ensure each clip matches the beat of the music.
Watch out for technical errors that need addressing or avoiding, such as:
- Out-of-focus shots
- Shaky footage
- Clips with multiple motions (like panning up and down)
- Shots that lack narrative (for instance, a stunned-looking bride clip).
- more.
If you’re editing a Highlight film, start by creating a story structure. Place your music on the timeline and intersperse audio bites throughout that narrate the couple’s story from beginning to end.
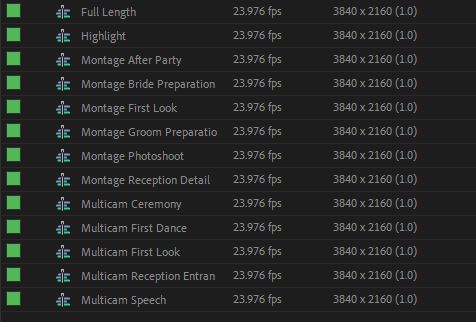
Break Them into Mini Sequences
When editing a Full Length film, avoid working on a single final sequence from start to finish. It can be exhausting because you might feel like the finish line is too far away and you’re not making progress.
Instead, break it into mini sequences.
What I mean by mini sequences is creating segments based on the montage edits from each event. For instance, if you’re editing a Groom Preparation montage, create a dedicated sequence for it.
Follow a similar process: place your selected music, add the culled clips, and edit them to craft a clean, cinematic montage.
Once you’ve completed the Groom Preparation montage, move on to editing montages for other events. By this stage, you’ll have montages from all events apart from the Multicam edits at the Ceremony and Reception.
When editing a Highlight film, ensure your story structure is ready first.
Once it’s set, start filling in the B-roll for the opening scene using the Culled Clips you’ve prepared. Perhaps begin with a drone clip, followed by venue shots, and intersperse with beautiful photoshoot clips.
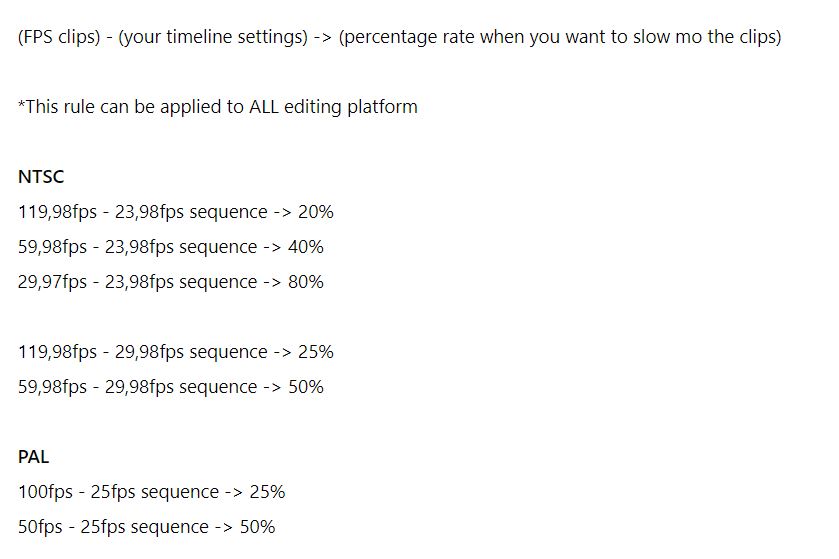
You can enhance your edits with effects like slow-motion for certain clips or speed ramping for dynamic motion shots (if the music supports it). There are industry guidelines for using slow-motion, which I’ve outlined in a picture that can help you determine the right percentage for your clips.
Let’s tackle each part step by step until your highlight film is complete.
Once You’re Finished, Combine Them into One Final Sequence
Your edited multicam scenes from the necessary events are ready, and your montage edits from other events are prepared.
Now, you just need to combine them into one final sequence.
Create a sequence, such as “Full Length Documentary Final.” Start by copying and pasting your Bride Preparation montage. Make sure you’ve placed the blue-line marker in Premiere Pro at the sequence’s beginning; otherwise, you’ll end up with a long black bar on your exported film.
Next, add your Groom Preparation montage.
Remember to set up transitions between these montages properly. You can add cross dissolves between the last and first clips of each montage. Pay attention to the music transitions, too; ensure that the clips and music flow smoothly when transitioning from the end of one montage to the beginning of the next.
When transitioning from montages to multicam editing scenes, ensure no clips are cut off abruptly. Also, ensure a smooth transition between the music and audio files from the multicam scenes.
Repeat this process until you reach the final event, such as the party dancing montage.
If your client has a logo, transition it to their logo at the end of the film. Once the logo appears, you can transition it out with a black bar. Typically, I set the black bar duration to a maximum of 2 seconds.
Now your Full Length film is finished.
Add SFX or GFX for the Final Touch
Adding SFX or GFX depends on the client’s style for the project you’re working on.
If they prefer a heavily designed sound, adding SFX after you finish editing is ideal. At this stage, your editing is complete, and you can focus solely on adding SFX to blend seamlessly with your edit.
When editing a wedding highlight film, you likely already have an idea of where you want to add SFX. For example, you might add bird sounds to a drone clip showcasing trees, or fountain water sounds to a venue clip featuring a fountain.
Similarly, with GFX, adapt to the client’s preferences.
Review their film samples to see if they prefer a lot of light leaks or just a few. Some videographers use light leaks to transition between events, while others use them extensively because they enjoy the effect.
It’s not just about light leaks.
The client might request an 8mm effect on certain beauty photoshoot clips. When applying this effect, ensure the clip’s composition remains pleasing. Avoid cutting off any important parts of the frame.
If adjustments are needed, modify the composition by adjusting motion settings in the Effect Controls. You might need to scale, rotate, or adjust the X and Y positions of the clip accordingly.
Apply Color Grading or Correction
Color grading is where the magic happens in the editing process!
This stage breathes life into your film, making it more vibrant, dynamic, and engaging. As Marco Sebastiano Alessi noted in his article, “Color can significantly impact how a scene is perceived and what emotions it evokes.”
Before diving into color work, check your service agreement. If you and your client agree not to perform any color adjustments, you can skip this step.
Otherwise, let’s continue!
First, set up your color workspace. Once you feel comfortable with your setup, you can begin the color grading process.
Here are some YouTube videos that might help you with color grading for your wedding video project:
Here are my tips for color grading your edit:
- Ensure consistency across all clips throughout the film. If you prefer warm and bold colors, avoid heavy magenta tones in your edit.
- The basic rule of color grading is achieving true colors. White should look white, skin tones should look natural, etc.
- Sometimes, due to shooting conditions, you may not be able to adjust colors perfectly. Do your best to make them consistent.
- In the color wheel, highlights, mid-tones, and shadows each serve different purposes. Adjust highlights for white dress colors, mid-tones for skin tones, and shadows for colors like a navy blue groom’s suit.
- You don’t always need to use all the color tools in Premiere Pro. Basic correction tools are often sufficient.
Color grading is where your film’s visual style comes alive, so enjoy the process and make your edits shine!
Perform a Final Check Before Exporting
Now that your editing is finished and you’ve already done the color grading, it’s time for the final checks before exporting!
During this final check, make sure to look for:
- Any black bars in the film due to improper clip fitting
- Any blue bars indicating warp stabilizer issues on your clips
- Any muted music or audio tracks
- And so on.
Ensuring these details are sorted out will help guarantee a smooth and professional final export of your video.
Export Your Final Sequence
When you’re confident that everything is polished, it’s time to export your edit! Here’s a step-by-step guide:
- Click on “File” at the top of your window.
- Navigate to “Export” and then select “Media”.
- Premiere Pro will open the Export section. Here, you can rename your film by adjusting the name in the “File Name” section. By default, the file name will match your sequence name.
- Set the location where the exported film will be saved by clicking “Location”.
- Ensure the “Preset” and “Format” are set according to your requirements. In the industry, we typically use the H.264 format for our films, with the “Preset” set to match source high bitrates.
- Click on the “Video” tab and scroll down to the “Bitrate” section. Adjust the bitrate according to your needs. For high-quality exports, set it between 50mbps to 100mbps. For uploading to platforms like Vimeo for previews, 15mbps is usually sufficient.
- Finally, click “Export”.
- Wait for the exporting process to complete.
- Done!
Post Editing on How to Edit Wedding Video
Review Your Final Film to Identify Any Errors
Here’s how you become your own quality checker.
During the editing stage, you often miss hidden errors because you’re focused on editing. That’s why checking after exporting is crucial.
When reviewing the exported film, pay attention to details you might have missed during editing.
For instance, observe the background activities behind the bride’s beautiful face—like a bridesmaid adjusting her bra—that can detract from the main focus.
If you spot such issues, reopen Premiere Pro and replace the problematic clip. It’s common to find yourself re-exporting the film multiple times.
In my early days as an editor, I re-exported a highlight film five times because I noticed errors or things that didn’t look good.
My goal was always to deliver high-quality editing that makes the couple happy!
So, at this stage, sharpen your focus and eagle eyes to catch any hidden errors or elements that don’t look right. Fix them and re-export until you’re satisfied with the result.
Deliver the Final Video to Your Client Once You’re Confident About It
In my experience, if I’m happy with my edit, the couple is usually happy when they watch their film later.
Once you’re satisfied and confident with your edit, ensuring that all requested changes have been implemented, you can send it to the client.
If you work directly with the couple, the final deliverable you’ll typically send is the exported film. However, if you’re working for a videographer, you may also need to send:
- Project files.
- Assets (music, GFX, SFX, and other editing assets).
- Exported film.
Dropbox and Google Drive are common platforms for wedding video editors to deliver their work.
They offer similar services but have different characteristics. For newcomers in the wedding video editing industry, the free accounts of these platforms are usually sufficient for delivering files to your clients.
Final Thought on How to Edit Wedding Video
Crafting a captivating wedding video involves a blend of technical finesse and storytelling prowess. From meticulously organizing footage to enhancing it with emotive music and thoughtful effects, each step plays a crucial role in creating a memorable film.
By refining your editing process and embracing creativity, you can transform moments into a narrative that resonates deeply with your clients, capturing the essence of their special day in a cinematic way.
Embrace the journey of wedding video editing as an opportunity to craft films that not only showcase your technical expertise but also celebrate the unique love stories of every couple.
Whether you’re just starting or refining your skills, remember that each film is a chance to delight and move your clients.
Ready to enhance your wedding video editing skills further?
Subscribe to our email list for more tips, tutorials, and insights into crafting unforgettable wedding films. Join us as we continue to elevate the art of storytelling through wedding video editing.
how to edit wedding video how-to
Last modified: August 21, 2024